
Ender 3 - 7 Upgrades
Practically everyone who has an Ender 3 and a YouTube channel will, at some point, do a video about upgrades they've done to make their printer work / look better. I'm no different, so here's my collection of improvements. Bear in mind I've already done some major work as a result of breaking the printer six months ago - a new mainboard, hot end, Bowden tube, limit switch and bed springs. Anyway, here goes:
1) MAGNETIC PRINT BED
The original print bed is held onto the heater plate by 4 mini bulldog clips. Actually 3, in my case, because I lost one. It really needed replacing because it was generally worn and had a number of grooves gouged into it from where my bed-levelling wasn't remotely correct. The magnetic print bed costs about £10 and comes in 2 parts.There's a magnetic base with an adhesive backing - you stick this to the printer's heated bed. The flexible top sheet is what you print on, and at the end of a print you can easily remove it and flex it to release the print. I've had perfect print adhesion since I started using it and I would recommend it.
Buy on Amazon: https://amzn.to/328mW4F
 2) SPOOL HOLDER FLANGED NUT
The spool holder that comes with the Ender 3 is adequate for most spools of filament, but I have some that are a teeny bit wider than the length of the spool holder rod, so they encroach onto the retaining nut and if you absent-mindedly tilt the printer with a spool on it, it will slide off and go crashing to the floor. This is not good. I solved it by grabbing an STL file of the retaining nut from Thingiverse, and adding a flange to the far edge.
Original nut model: https://www.thingiverse.com/thing:3406269
My modified version: https://www.thingiverse.com/thing:3832633
 3) FILAMENT GUIDE
This is something that almost everyone has, and it is very useful. Basically it protrudes from the end of the top rail and you feed the filament through a loop at the end. It keeps the filament well away from the z-axis lead screw, and removes any twists or kinks in the filament so that it enters the extruder more or less straight. I used this file as is, without any modification.
Filament guide model: https://www.thingiverse.com/thing:2917932
 4) CONTROL BOX FAN COVER
There are many versions of this kicking around. The Ender 3 has a massive design flaw - the cooling fan for the control box faces directly upwards, and is positioned just under the edge of the print bed where it inevitably gets bits of filament falling onto the fan. My design features a slimline 'rotunda' with numerous small holes around the edge. It fits on top of the existing cover plate and you'll need 2 M3 10mm screws to fix it. My design also features indicators showing which way to turn the bed-levelling knobs to make it tighter or looser.
My design on Thingiverse: https://www.thingiverse.com/thing:3833570
 5) LCD PANEL REAR COVER
Many parts of the Ender 3 have an unfinished feel to them - none more so than the exposed back of the LCD. While this is perfectly safe, there are some sharp bits of solder on the PCB and it just looks shabby. I grabbed a cover plate design from Thingiverse and used it unmodded. As designed, you are supposed to remove the 4 screws holding the PCB onto the metal plate and fix it back on with the rear cover using 4 longer screws. However, in my print the holes were misaligned so I ended up using Blu-Tack to hols the cover on. It's work fine, but I may need to revisit it in the future.
Original model: https://www.thingiverse.com/thing:2918087
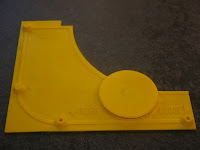
 6) TOOL TRAY
Now we come to that big hole in the middle of the printer, between the control box and the display panel. What to do with it? At the very least you'll want to do something about that messy ribbon cable connecting the LCD to the mainboard. There are clips on Thingiverse that will hold it against the mid-rail of the printer. But there are also lots of tool trays where you can stow things like your scraper, your snippers, assorted hex keys and anything else you can't live your 3D printing life without. I designed my own, and it hooks into the v-slots at the back and sides. You will need to flex the taller hooks slightly to get it in, so be careful not to snap them.
My design on Thingiverse: https://www.thingiverse.com/thing:3833633
 7) CONTROL KNOB WITH LEVER
This is my favourite of this bunch of mods, a replacement for the push/turn control knob that comes with the Ender 3. If you've ever used the original knob to set a nozzle temperature of, say 200°C, you'll know that you're in for a tedious 10-15 seconds of turning and turning that knob. My replacement knob has a tail that you can pop your finger into - this enables you to whizz the knob around much more quickly, plus it looks fun. And, like all the mods I printed, it's yellow, which I think makes a splendid contrast with the black of the printer.
My design on Thingiverse: https://www.thingiverse.com/thing:3833667
Let me know on here or on Thingiverse.com if you print any of my things - I'm always happy to try to answer questions.
1) MAGNETIC PRINT BED
The original print bed is held onto the heater plate by 4 mini bulldog clips. Actually 3, in my case, because I lost one. It really needed replacing because it was generally worn and had a number of grooves gouged into it from where my bed-levelling wasn't remotely correct. The magnetic print bed costs about £10 and comes in 2 parts.There's a magnetic base with an adhesive backing - you stick this to the printer's heated bed. The flexible top sheet is what you print on, and at the end of a print you can easily remove it and flex it to release the print. I've had perfect print adhesion since I started using it and I would recommend it.
Buy on Amazon: https://amzn.to/328mW4F

The spool holder that comes with the Ender 3 is adequate for most spools of filament, but I have some that are a teeny bit wider than the length of the spool holder rod, so they encroach onto the retaining nut and if you absent-mindedly tilt the printer with a spool on it, it will slide off and go crashing to the floor. This is not good. I solved it by grabbing an STL file of the retaining nut from Thingiverse, and adding a flange to the far edge.
Original nut model: https://www.thingiverse.com/thing:3406269
My modified version: https://www.thingiverse.com/thing:3832633

This is something that almost everyone has, and it is very useful. Basically it protrudes from the end of the top rail and you feed the filament through a loop at the end. It keeps the filament well away from the z-axis lead screw, and removes any twists or kinks in the filament so that it enters the extruder more or less straight. I used this file as is, without any modification.
Filament guide model: https://www.thingiverse.com/thing:2917932

There are many versions of this kicking around. The Ender 3 has a massive design flaw - the cooling fan for the control box faces directly upwards, and is positioned just under the edge of the print bed where it inevitably gets bits of filament falling onto the fan. My design features a slimline 'rotunda' with numerous small holes around the edge. It fits on top of the existing cover plate and you'll need 2 M3 10mm screws to fix it. My design also features indicators showing which way to turn the bed-levelling knobs to make it tighter or looser.
My design on Thingiverse: https://www.thingiverse.com/thing:3833570

Many parts of the Ender 3 have an unfinished feel to them - none more so than the exposed back of the LCD. While this is perfectly safe, there are some sharp bits of solder on the PCB and it just looks shabby. I grabbed a cover plate design from Thingiverse and used it unmodded. As designed, you are supposed to remove the 4 screws holding the PCB onto the metal plate and fix it back on with the rear cover using 4 longer screws. However, in my print the holes were misaligned so I ended up using Blu-Tack to hols the cover on. It's work fine, but I may need to revisit it in the future.
Original model: https://www.thingiverse.com/thing:2918087

Now we come to that big hole in the middle of the printer, between the control box and the display panel. What to do with it? At the very least you'll want to do something about that messy ribbon cable connecting the LCD to the mainboard. There are clips on Thingiverse that will hold it against the mid-rail of the printer. But there are also lots of tool trays where you can stow things like your scraper, your snippers, assorted hex keys and anything else you can't live your 3D printing life without. I designed my own, and it hooks into the v-slots at the back and sides. You will need to flex the taller hooks slightly to get it in, so be careful not to snap them.
My design on Thingiverse: https://www.thingiverse.com/thing:3833633

This is my favourite of this bunch of mods, a replacement for the push/turn control knob that comes with the Ender 3. If you've ever used the original knob to set a nozzle temperature of, say 200°C, you'll know that you're in for a tedious 10-15 seconds of turning and turning that knob. My replacement knob has a tail that you can pop your finger into - this enables you to whizz the knob around much more quickly, plus it looks fun. And, like all the mods I printed, it's yellow, which I think makes a splendid contrast with the black of the printer.
My design on Thingiverse: https://www.thingiverse.com/thing:3833667
Let me know on here or on Thingiverse.com if you print any of my things - I'm always happy to try to answer questions.


Comments
Post a Comment